
Showing posts with label Cooking. Show all posts
Showing posts with label Cooking. Show all posts
03 September 2012


22 August 2012


05 February 2012
Chicken and Rice Porridge: How to Make Arroz Caldo in Pictures

-Wikipedia
Funny enough, I had to check out Wikipedia how this dish comes about. In its plain basic form, Lugaw - it is just a rice porridge with no meat. There are other versions: tripe topping (Goto), Tofu and Pork Ears on the side (Tokwa't Baboy) topping or with a Hard Boiled Egg. This is all about the version with chicken in it - Arroz Caldo.
Ingredients:
 |
| 2 pieces of shallots, Ginger (about 2 segments) and One Whole Garlic |
 |
| 5-6 pieces of Chicken Thighs |
 |
| 2 cups of Uncooked Long Grain White Rice Salt and pepper to taste (not in photo.) |
Procedure:
 |
| Chop ginger into strips - so you can easily take it out while eating. Mince Garlic and Shallots |
 |
| In a pan on medium high heat, fry all your minced garlic until it is golden brown. |
 |
| Drain and Set Aside |
 |
| In the same pan, render out the chicken fat. When you get a good amount of rendered fat and the chicken starts bleeding, turn off stove and take chicken out of the pan. |
 |
| Drain out all the chicken fat and throw it away. Trust me, there will be more. |
 |
| Peel off the chicken skin with tongs. |
 |
| Put the skinless thighs back in the pan to render out more fat. |
 |
| As the thighs cook, lay out the skins on a tray with a pan at the bottom. |
| Toast the chicken skin to a crisp! |


 |
| You know it's done when it turns into this lovely golden brown color. |
 |
| Take your chicken out again, check how much rendered fat is at the bottom of the pan. If there is too much, take some out. There should be enough because you already took out a lot of it earlier. |
 |
| Add shallots and ginger at the same time. |
 |
| Keep Stirring until the shallots turn transparent. |
 |
| Add your chicken and rice. Don't worry if it still a little bloody and raw. It will all cook off. |
 |
| Add water and a bit of salt. Keep Stirring. Dont Let it Dry up. |
 |
| Add Water, LOTS OF WATER. Rice absorbs water as it cooks. Your goal is to make it absorb more water than it can take so it splits up. |
 |
| This is what you are aiming for. |
 |
| After the rice splits up, add all the fried garlic in the pot. Season with a bit of Salt and Pepper to taste. |
 |
| Put in a bowl and serve with the chicken skin, some soy sauce and lemon. |
This is one of my favorite winter blues cures. The dish is relatively simple and familiar. Ingredients are relatively available in American supermarkets.
If you made this dish, send me a photo!
09 April 2011
Filipino Spaghetti Recipe Using Ingredients From American Supermarkets
Spaghetti with Hotdogs and Ham + Birthday Cake = Birthday
Party!
If you tell me that there is a birthday party, you can
expect that I will be counting “the amount of sleeps” before it happens. While I
will be excited about the balloons and the party favors, nothing gets me to be
more enthused about birthday parties than Spaghetti with Hotdogs and Ham.
Forget the cake, because usually it is mocha chiffon inside *blech* but the
Spaghetti! THE SPAGHETTI!!! Oh, I would think about all the twirling, swishing
of the sauce and the melty cheese. I would keep the hotdogs to the side and eat
them last. Aaaaah. Spaghetti! I was 6.

Spaghetti is what is mostly served in children’s birthday
parties back home. Even if it’s a birthday
without a party, it is NOT A PROPER birthday without eating spaghetti. We also
believe that eating noodles on your birthday will bring you long life, and it doesn’t
matter what kind of noodles - but for me, nothing beats eating Spaghetti on
your birthday.

Ingredients:
1lb box of Spaghetti, Cooked according to package
directions then do step 1.
1lb ground pork (beef is a good substitute, but its not
the same.)
½ lb of hotdogs, sliced
1 6oz pack of cooked sweet ham, sliced into squares (the
sliced ones that are square shaped, found in the deli aisle)
1 medium sized onion, Minced
4 cloves of garlic, minced
1 bottle of Ragu, Chunky Garden Combination (why? Other flavors
have overpowering Italian seasoning. This was surprisingly the closest tasting
one I found.)
1-2 Tablespoons of sugar
Salt and Pepper to taste
3 Tablespoons of butter
1 Tablespoon of cooking oil
4oz Mild Cheddar Cheese, Grated
 |
| After cooking your spaghetti according to package directions, Drain it (dont wash it - i used to). When it is completely drained, toss 1 1/2 tablespoon of butter in it. Set Aside. |
 |
| Heat up your oil. When it's hot, saute the garlic. |
 |
| After your garlic cooks a little bit, add the onions. Cook until transparent. |
 |
| Add your ground pork. Make sure the ground pork gets separated. Season with a bit of salt and pepper. |
 |
| When your pork has rendered out its juices but not completely brown, add your sliced hotdogs. Keep stirring. |
 |
| When the hotdogs are showing signs of doneness, add cooked ham. Make sure to separate the ham stacks. |
 |
| Keep stirring until the rest of the ground pork is browned like this. All the flavors will be rendered by this time. If you find it swimming in pork fat, drain out the fat. |
 |
| Add the Ragu. Put about 1/4 cup of water in the bottle to get every last bit of sauce, and pour it in. |
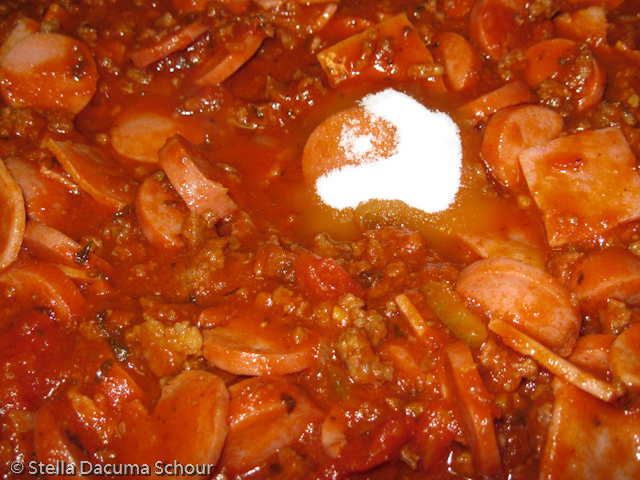 |
| Add some Salt, Pepper to taste and 1.5 tbsp of sugar. If you cant taste the mildly sweet flavor, add more. Remember, you can add but you cannot take away. This Chunky Ragu flavor is sweet enough that you don't need to add more than 1.5 tbsp of sugar. |
 |
| Add in your grated mild cheddar cheese. DONT USE PARMESAN CHEESE. |
 |
| Melt the cheese in and your sauce should turn orangey in color. You know you did well when you achieve this. |
 |
| Finish your sauce off with 1 1/2 tbsp of butter. Mmm! |
 |
| Toss in with the noodles and you are good to go! Serve with more grated cheese if you please. Happy Birthday! |
I am posting this recipe, using ingredients found in
regular American supermarkets because this recipe was requested by Fadra and Tammy.
While you can add banana ketchup if you please, I don’t add it in my recipe
because I outgrew the taste of banana ketchup. I used to pour the stuff over
rice and make my rice pink. Don’t ask.
Also, I like the idea of having recipes accessible, even
to people who do not have an Asian market around them. Enjoy.
Leftover sauce? Don’t throw it away. Take a piece of
bread, spread extra sauce on top, grate some more mild cheddar cheese on it and
toast!!
04 April 2011
Spam Is Better Fried Masthead Recipe

I made this masthead for my friend Roxwriting. This
started out as a joke on the weekend that both of us had nothing to do and we
were making fun of her blog title. Staring at it makes me want to eat it.
Ingredients:
1 Can of Spam
A pat of butter
Some Olive Oil
Some Sugar
Equipment Needed:
X-acto Knife
Cutting Mat
Scissors (Optional)
Freezer
Tongs
Knife
Chopping Board
Stove
Frying Pan
Cardstock
Camera
Computer and Printer
1. Take
a photo of Spam Can. Make sure it is not tilted in any way.

2. Template
– Print out a 1.5 inch and 2 inch spam logo on cardboard stock. Make sure this
is manageable for you to cut, and will fit in your printer. Printing on paper
is fine too but you need it to not bend or disintegrate.

3. Slice
your Spam in about quarter inch thick, Taller than 2inches and a bit wider than
2 inches. The letter M is wide. FREEZE for about an hour or more. You need the
Spam to be a bit firmer.

4. While
it is freezing, cut out your letters either with an X-acto knife or scissors. Don’t
forget to cut out the insides of letters P and A. (these “holes” are called
counters.)

5. Take
out your Spam from the freezer. You don’t need it to be frozen as it will be
hard to carve. Place your template over the spam for a proper fit.

6. Start
carving. I carved most of the Spam using an X-acto knife. This paring knife
looks good in the photo but is not a good carving tool.

7. Heat
up your frying pan. I use a Calphalon Hard Anodized Nonstick pan. This pan
distributes heat evenly. Melt a bit of butter and some olive oil.Fry the
right side first. Cook it carefully in the lowest possible heat setting. After
a minute or two, take it out, and coat it with a bit of sugar. This will give
it a caramel brown color. Once it is done on the right side, take it out of the
pan so you can set your camera.

8. This
is what my camera set up looks like. Im using a Benro Flexpod C297EX. My
wonderful tripod “bends” to a 90-degree angle. Inside that turquoise bag is a
heavy saucepan, it keeps my camera from falling into the frying pan.

9. Heat
the frying pan again, and fry the Spam right side up. If you don’t have enough
frying bubbling action, add some butter or olive oil. Butter makes those slow
moving frying bubbles, and the olive oil will keep it from burning.

10. Take
all the pictures you want until you get that perfect bubble inside and outside
the letters!
Just in case you are curious:
This is what the bottom of my letters looked like after I
was done. It looks burned and it was just starting to burn, so I tasted it
after taking this photo.

It tasted good, so I had it for dinner. MMMmmm. Spam!


***I have been eating Spam since childhood
as this is a special treat in the Philippines. I still love eating it from time
to time and yes, SPAM IS BETTER FRIED (and eaten with rice and egg).
***** I did say "special treat." Spam is not cheap in the Philippines. So we sometimes eat substitutes like Ma Ling and whatever luncheon meat form we find. We love them all the same.
Subscribe to:
Posts (Atom)