Newsletter Spread Fornat
Please note that pages 2&3 are set as a spread and that Scribd adjusted its size to fit the width. See below for readability. Note that the "Papri Chaat Assembly" will lose its continuity. Ethnic Eats is not a real publication - all photos are taken by me and all articles are taken from this blog with revisions.
Newsletter Layout

Showing posts with label DIY. Show all posts
Showing posts with label DIY. Show all posts
24 March 2012


28 June 2011
Decorative Toilet Paper Storage
NYC living means small spaces. We do not have huge pantries, garages (most of us don't even have cars) and we always need to have extra toilet paper in the bathroom.
This really started out because my husband and I would have spats because I always forget to put an extra roll of toilet paper under the sink. I got tired of it so i thought of a solution that DOES NOT COST MONEY. Tada!

You too, can have the same storage! You will never have to worry about running out of toilet paper while doing your business in the bathroom and guests don't need to ask you for a new roll. The best part is, the cost is ZERO DOLLARS. These things are available around your home.
You will need:
Ribbon or String that is available on hand, or something that matches your decor
Skewer, half a chopstick or a pencil - any rigid object that can go through a toilet paper roll and can carry the weight.

Dinner Napkins or Tissue Paper (optional) - The ones that come out of gift wrapping is great! Upcycling is good! The dinner napkins and tissue paper here are excess from our wedding.

First, Secure your skewer/chopstick/pencil at the end of the ribbon with a knot. You may glue it if you wish, but you dont really need to.

The finished product should look like this, without the extra knots if you have one long continuous ribbon. In this case, I used 4 short ribbons so i can have the desired length to hold 6 rolls in one go. Your TP storage, no matter how long or short you want it is now done.

Usage:
Thread the ribbon through the cardboard roll.


Make sure your skewer/chopstick/pencil is in a horizontal position and will keep your TP on the holder.

Find an empty hook and hang! Voila!

Optional: Wrapping your TP with decorative paper
Lay your toilet paper on the middle of the dinner napkin

Gather both edges to the center and tuck excess into the cardboard tube. Don't worry if it is not covering it all around. Just turn it towards the back. It also allows guests to see what is behind the colorful paper in the bathroom.

Make sure you dont cover the hole completely. You need the holder to go through in it.

If you have a whole piece of Tissue Paper, divide it lengthwise into three.

Hold it in a way that the two edges meet.

Fold it over and tuck into the cardboard tube.

When it is all done, thread your holder through. YAY!

And of course, hang!

This really started out because my husband and I would have spats because I always forget to put an extra roll of toilet paper under the sink. I got tired of it so i thought of a solution that DOES NOT COST MONEY. Tada!

You too, can have the same storage! You will never have to worry about running out of toilet paper while doing your business in the bathroom and guests don't need to ask you for a new roll. The best part is, the cost is ZERO DOLLARS. These things are available around your home.
You will need:
Ribbon or String that is available on hand, or something that matches your decor
Skewer, half a chopstick or a pencil - any rigid object that can go through a toilet paper roll and can carry the weight.

Dinner Napkins or Tissue Paper (optional) - The ones that come out of gift wrapping is great! Upcycling is good! The dinner napkins and tissue paper here are excess from our wedding.

First, Secure your skewer/chopstick/pencil at the end of the ribbon with a knot. You may glue it if you wish, but you dont really need to.

The finished product should look like this, without the extra knots if you have one long continuous ribbon. In this case, I used 4 short ribbons so i can have the desired length to hold 6 rolls in one go. Your TP storage, no matter how long or short you want it is now done.

Usage:
Thread the ribbon through the cardboard roll.


Make sure your skewer/chopstick/pencil is in a horizontal position and will keep your TP on the holder.

Find an empty hook and hang! Voila!

Optional: Wrapping your TP with decorative paper
Lay your toilet paper on the middle of the dinner napkin

Gather both edges to the center and tuck excess into the cardboard tube. Don't worry if it is not covering it all around. Just turn it towards the back. It also allows guests to see what is behind the colorful paper in the bathroom.

Make sure you dont cover the hole completely. You need the holder to go through in it.

If you have a whole piece of Tissue Paper, divide it lengthwise into three.

Hold it in a way that the two edges meet.

Fold it over and tuck into the cardboard tube.

When it is all done, thread your holder through. YAY!

And of course, hang!

You have two ways of taking the toilet paper out.
1. Push all of them upward and thread your skewer/chopstick/pencil to take one out.
2. Take the whole thing off the hook and take the topmost roll.
The best part about this is that you can change the decorative paper to match the party you are having, the current season or just your mood.
01 June 2011
Our Handmade Wedding
 |
| Save the date Cards |
 | |
| Wedding invitations invitation text was inspired by the song "be my guest" from the animated film Beauty and the Beast |
 |
| RSVP Cards Having a reply deadline stopped me from calling the people who has not sent in their RSVPs. |
 |
| Table decor and wedding favor |
I picked our wedding favors to be useful at the wedding itself. Again, since it has a theme of its own, I had to source the contents and ask my friends and family help assemble the boxes.
 |
| Inside the wedding favors The items inside the boxes helped our guests *survive* our wedding. I have packed bibs and wetnaps because we served bbq and roast pig at the reception. |
I chose origami flowers over fresh flowers because I didn't want to spend money for things that will last me a couple of hours (and I have allergies). On top of that, I didn't have to do special wedding bouquet and corsage preservation. It will be as fresh as the day my husband and father-in-law folded them. YAY!
 |
| My wedding bouquet and corsage |
Decorating the aisle with a flowers would have proved to be time consuming and I will have to find pedestals for them. Solution: Paper pinwheels on dowels! They spin with the blowing wind!
 |
| Wedding Ceremony Photo credit: Angie Dykshorn |
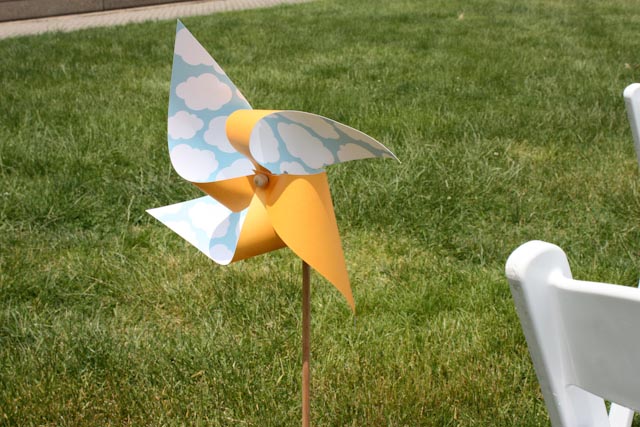 |
| Paper pinwheel aisle marker Photo credit: Sara Markel-Gonzalez |
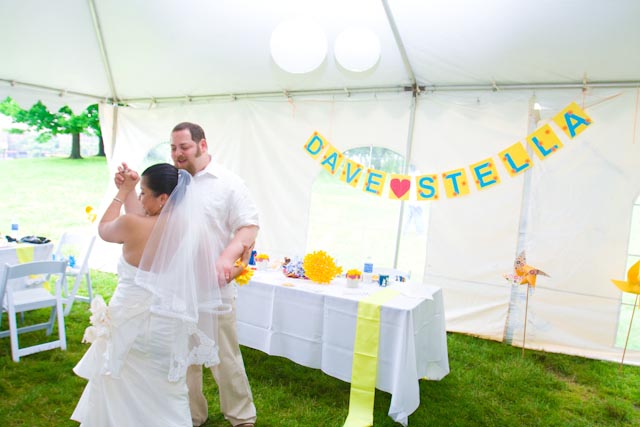 |
| Sweetheart table and backdrop Photo credit: Angie Dykshorn |
Looking back, I wouldn't change a thing. I am happy with how everything turned out. And I am happier that our first 365 days together has been a blast! Here's to the years ahead of us! Cheers!
 |
| Thank you cards Top photo credit: Angie Dykshorn Bottom photo credit: Carol Colby Tanenbaum |
************
To everyone who shared this special day with us, Thank you.
10 May 2011
Fried Whole Fish: Make It, Debone It & Eat It!
Growing up in Manila (Philippines), fried fish is usually on the dinner table. I loved having fried fish for dinner because this means that I can douse my rice pink with banana ketchup. As a child, I didn’t know what fish sticks are, and I first learned about fish fillet from McDonald’s Fillet O’Fish Sandwich.
Knowing how to debone fish at the dinner table is one of the best eating skills I learned. I get looks from fellow diners whenever I suggest ordering a whole fish dish at an Asian restaurant. I googled and surprisingly enough for me, it was a topic of conversation on Chowhound.
Cooking the Fish
Ingredients:


 |
| It is a bit burned, I know. |
Knowing how to debone fish at the dinner table is one of the best eating skills I learned. I get looks from fellow diners whenever I suggest ordering a whole fish dish at an Asian restaurant. I googled and surprisingly enough for me, it was a topic of conversation on Chowhound.
 |
| I am so handsomely fresh! |
I always buy fish from the Asian supermarket. When buying fish, make sure the eyes are not red and they look healthy. The flesh should also spring back when you poke it. This particular one squirmed after I poked it. Sold! Fish in Asian supermarkets are always fresh because WE LOVE FISH!
 |
| These guys in the green apron will clean and gut your fish. |
 |
| Fish minus the styrofoam packaging? FRESH PRIDE! |
 |
| Picky about freshness? Live fish and lobster is available too! |
Cooking the Fish
Ingredients:
 |
| Imitating a mermaid centerfold pose. |
1 Tilapia (BUY ONE THAT WILL FIT IN YOUR FRYING PAN.)
Cooking Oil for Pan Frying
2 cloves of garlic, Crushed
Rock Salt – iodized is fine as well.
- Clean and rinse your fish again. Make sure you have no part of the guts left in the cavity.
- Cut slits on the side of the fish and put a very light sprinkling of salt all over, including the inside of the cavity. The slits allow the fish to cook inside.
- Heat the cooking oil on your frying pan on medium high heat. Don’t waste olive oil for frying fish.
- Flick a little bit of water in the oil. If it violently goes out, it is hot enough.
 |
| My G-Section (where they removed my guts from) |
 |
| Grace under pressure |
- Gently but quickly put the fish down in the oil. DON’T THROW IT IN THE PAN. You don’t want to burn yourself. Put the garlic in as you fry. Leave it alone. The garlic helps in giving the crispy brown coating. Turn the heat down to medium low heat. You want the insides to cook before burning the skin.
- You will know the fish is ready to turn after the frying cackling sound goes down and the fish is easily released from the bottom of the pan.
- After flipping the fish, flip your garlic too.
 |
| Fried Golden Brown. The slits open up the fish. |
 |
| Crispy on the outside, flaky on the inside. Yummy all around. |
 |
| My mom's favorite part of the fish. (I am not kidding.) |
Dipping Sauce

This is entirely up to you. When I was a kid, I loved banana ketchup. I doused banana ketchup on my rice to make it turn pink.
 |
| Chili Soaking in Vinegar, Kikkoman Soy Sauce This bottle is different because it is imported form Japan. It smells and tastes different from the Kikkoman Soy Sauce made in US. Yes it looks like a water bottle but Kikkoman has looked like this back in the 80s. When bottled water was not common. |
I was feeling very traditional so I made some lemon-soy-vinegar. I keep three kinds of vinegar on hand: Balsamic, Regular White/Cane Vinegar and Spicy Vinegar. Start mixing one teaspoon of vinegar and soy sauce. Add whichever needs more, then squeeze some lemon.
Deboning
Fish generally have a thorny skeleton that runs through the middle of its body. I have scribbled them in different colors so you can tell which I am talking about:

- Blue – This is the Main skeleton. This is what is represented as fish bones in cartoons.
- Purple – On the main skeleton this runs on the vertical, if the fish is lying flat like this. This will intersect with the middle part of the blue skeleton. Expecting it to be there avoids accidentally swallowing the fish bone.
- Yellow – this runs on the side of the fish.
- Green – this is the fish’s “ribcage” these are extra long bones and protects the guts of the fish. YOU CANT MISS THEM.
 |
| The *fish rib bone* |
Knowing where these bones will be will make your whole fish eating easier. If this is your first time eating whole fish, DON’T WORRY ABOUT DOING IT WITH CUTLERY- EAT WITH YOUR HANDS! It takes practice to debone fish tableside. Learning about the fish’s anatomy will make it easier for you to navigate the whole fish that is usually on a buffet table.
Fish head? Well, you can eat that too. My mom loves it. I am not a big fan.
Eating tilapia that has been cooked as a whole generally has a better taste than a tilapia fillet. I still don’t understand fish sticks, and I will not buy deboned/filled fish unless it is a slice of salmon with the skin intact.
09 April 2011
Filipino Spaghetti Recipe Using Ingredients From American Supermarkets
Spaghetti with Hotdogs and Ham + Birthday Cake = Birthday
Party!
If you tell me that there is a birthday party, you can
expect that I will be counting “the amount of sleeps” before it happens. While I
will be excited about the balloons and the party favors, nothing gets me to be
more enthused about birthday parties than Spaghetti with Hotdogs and Ham.
Forget the cake, because usually it is mocha chiffon inside *blech* but the
Spaghetti! THE SPAGHETTI!!! Oh, I would think about all the twirling, swishing
of the sauce and the melty cheese. I would keep the hotdogs to the side and eat
them last. Aaaaah. Spaghetti! I was 6.

Spaghetti is what is mostly served in children’s birthday
parties back home. Even if it’s a birthday
without a party, it is NOT A PROPER birthday without eating spaghetti. We also
believe that eating noodles on your birthday will bring you long life, and it doesn’t
matter what kind of noodles - but for me, nothing beats eating Spaghetti on
your birthday.

Ingredients:
1lb box of Spaghetti, Cooked according to package
directions then do step 1.
1lb ground pork (beef is a good substitute, but its not
the same.)
½ lb of hotdogs, sliced
1 6oz pack of cooked sweet ham, sliced into squares (the
sliced ones that are square shaped, found in the deli aisle)
1 medium sized onion, Minced
4 cloves of garlic, minced
1 bottle of Ragu, Chunky Garden Combination (why? Other flavors
have overpowering Italian seasoning. This was surprisingly the closest tasting
one I found.)
1-2 Tablespoons of sugar
Salt and Pepper to taste
3 Tablespoons of butter
1 Tablespoon of cooking oil
4oz Mild Cheddar Cheese, Grated
 |
| After cooking your spaghetti according to package directions, Drain it (dont wash it - i used to). When it is completely drained, toss 1 1/2 tablespoon of butter in it. Set Aside. |
 |
| Heat up your oil. When it's hot, saute the garlic. |
 |
| After your garlic cooks a little bit, add the onions. Cook until transparent. |
 |
| Add your ground pork. Make sure the ground pork gets separated. Season with a bit of salt and pepper. |
 |
| When your pork has rendered out its juices but not completely brown, add your sliced hotdogs. Keep stirring. |
 |
| When the hotdogs are showing signs of doneness, add cooked ham. Make sure to separate the ham stacks. |
 |
| Keep stirring until the rest of the ground pork is browned like this. All the flavors will be rendered by this time. If you find it swimming in pork fat, drain out the fat. |
 |
| Add the Ragu. Put about 1/4 cup of water in the bottle to get every last bit of sauce, and pour it in. |
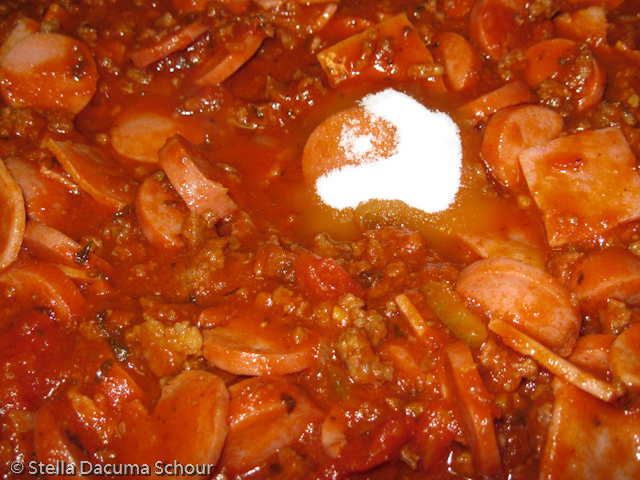 |
| Add some Salt, Pepper to taste and 1.5 tbsp of sugar. If you cant taste the mildly sweet flavor, add more. Remember, you can add but you cannot take away. This Chunky Ragu flavor is sweet enough that you don't need to add more than 1.5 tbsp of sugar. |
 |
| Add in your grated mild cheddar cheese. DONT USE PARMESAN CHEESE. |
 |
| Melt the cheese in and your sauce should turn orangey in color. You know you did well when you achieve this. |
 |
| Finish your sauce off with 1 1/2 tbsp of butter. Mmm! |
 |
| Toss in with the noodles and you are good to go! Serve with more grated cheese if you please. Happy Birthday! |
I am posting this recipe, using ingredients found in
regular American supermarkets because this recipe was requested by Fadra and Tammy.
While you can add banana ketchup if you please, I don’t add it in my recipe
because I outgrew the taste of banana ketchup. I used to pour the stuff over
rice and make my rice pink. Don’t ask.
Also, I like the idea of having recipes accessible, even
to people who do not have an Asian market around them. Enjoy.
Leftover sauce? Don’t throw it away. Take a piece of
bread, spread extra sauce on top, grate some more mild cheddar cheese on it and
toast!!
Subscribe to:
Posts (Atom)